Snacks

Food Friday: Coconut Paradise Bars

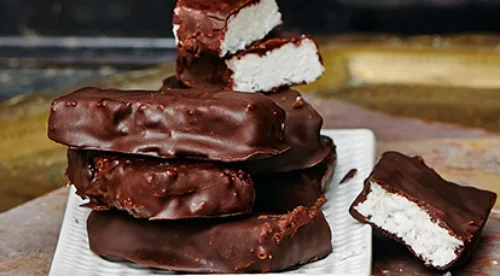
I have made these a couple times as a treat, then brought them into work, and every time they disappear just a quickly as I bring them in. They are that delicious! If you like Bounty Bars, but don’t like all the additives and extra sugar they have, you are in for a treat. These have only honey as a natural sweetener and filled with soothing and nourishing coconut. The bonus is the chocolate coating on top, and you can even make your own with cocoa powder, maple syrup and cacao butter if you are ambitious. These are adapted from one of my favourite cookbooks Hemsley and Hemsley. 

The Nitty Gritty

Coconut oil is becoming another hot topic these days and for some good reasons. It has a higher smoke point therefore great for baking at a higher temperature. It is also a saturated fat but mainly comprised of medium-chain fatty acids, including lauric acid and caprylic acid, instead of long-chain fatty acids. MCFAs can be absorbed directly into the circulation, for a quick source of energy. Coconut cream is similar to coconut milk but with less water content. It is higher in calories and saturated fat, therefore good to eat in moderation, hence don’t eat the whole pan. 😃 Cut these into smaller bars and you have a delicious, nutritious treat that won’t send your blood sugar levels flying high. 

Paradise Bars

(Makes 24 bars)

Ingredients:

  • 1 package creamed coconut (just under 1 cup)(can be found at Sobey's or Pete's)

  • 6 tbsp coconut oil

  • 3 tbsp raw honey

  • 1 ½ tsp pure vanilla extract

  • a pinch of salt

  • just under ¾ cup shredded coconut (unsweetened)

  • 7 oz (85% cocoa solids) dark chocolate (I use Bakers semi-sweet chocolate)

Recipe:

  1. Line a 8 in square pan with parchment paper. In cold weather, place the unopened packet of creamed coconut in a bowl of warm water to melt it through (massage the packet to help it along). In warm weather, the creamed coconut will already be fluid enough.

  2. When it’s soft all the way through, pour into a bowl and mix in the coconut oil (it will melt if it’s hard), raw honey, vanilla, salt and 2-4 tbsp water if you like a softer centre.

  3. Stir in the shredded coconut evenly to create a doughy consistency.

  4. Pour the dough into the prepared pan. Press the mixture down with the back of a spoon to make it level and set in the fridge for 15 minutes until hard.

  5. Turn the pan of coconut mixture out onto a chopping board and slice into 6 horizontal slices by 4 vertical. Place them onto a baking sheet lined with parchment paper and keep in the freezer while you prep the chocolate.

  6. Melt the chocolate in a glass or metal bowl over a pan of warm water – make sure the water does not touch the bottom of the bowl and do not allow the water to boil or simmer – you may have to keep removing from the heat. This should take about 30 minutes. (Alternatively, melt chocolate in a pot on the stove slowly and let cool slightly.)

  7. When the chocolate has almost melted, take the bowl off the heat. Leave it to cool as much as possible without it hardening to give a thicker coating to the paradise bars – stir occasionally.

  8. Dip the frozen coconut bars into the chocolate using two forks, letting the excess drip off, and carefully place back onto the cold baking tray, leaving space between each bar. If the chocolate mixture becomes too cold, you may need to put it back over the simmering water again.

  9. When you’ve finished dipping all the bars, place the tray back into the fridge until set. Once set, seal in a container in the fridge or freezer until required. They will keep in the fridge for a month – longer in the freezer (if they last!).

Enjoy!!

In health & happiness,

Dr. Karen

(Photo credit: www.getthegloss.com)

Food Friday: Almond Power Cookies

Warning: This is not a Christmas cookie but still delicious :)

These are a great option if you need something quick in the morning, or something a little sweet in the afternoon. They are grain/gluten-free and egg-free, great for those with food sensitivities or who are on an elimination diet. With only 1 tablespoon of sweetener, you can snack on them guilt free. Just avoid eating the whole batch, like I was tempted to do! This recipe is adapted from Against All Grain. She uses dried cherries and sliced almonds, so feel free to substitutes the fruit and/or nuts with what you like. Even try substituting peanut or cashew butter for the almond butter. Still just as tasty.

Ingredients:

  • 2 tbsp ground chia seeds
  • 1/2 cup unsalted almond butter, unsweetened
  • 1/2 cup ground flaxseed
  • 1/2 cup arrowroot powder
  • 1/2 cup unsweetened applesauce
  • 1 tbsp pure maple syrup
  • 2 tsp ground cinnamon
  • 1 tsp lemon juice
  • 3/4 ground nutmeg
  • 1/2 tsp ground ginger
  • 1/4 tsp sea salt
  • 1/2 tsp baking soda
  • 1/2 cup raisins (or unsulfured and unsweetened dried cherries, chopped)
  • 1/4 cup dark chocolate pieces (80% cacao)
  • 1/2 cup chopped walnuts (or sliced almond for on top) 

Recipe:

  1. Preheat the oven to 350F and line two baking sheets with parchment paper.
  2. Whisk together 1/2 cup hot water and the ground chia seeds and let sit at room temperature while you prepare the remaining ingredients.
  3. Meanwhile, in a bowl, combine the almond butter, flaxseed, arrowroot, applesauce, maple syrup, cinnamon, lemon juice, nutmeg, ginger and sea salt. Mix to combine fully. (Option to use a stand mixer.)
  4. Add the thickened chia mixture to the bowl with the baking soda and beat again until fully combined. Stir in the walnuts, raisins and chocolate pieces.
  5. Using a cookie scoop or a large spoon, drop dough onto the lined baking sheets. Wet fingers slightly with warm water and gently press the mounds down to flatten slightly. (Optional: Sprinkle the tops of the cookies with sliced almonds.)
  6. Bake for 15 minutes, until golden brown around the edges. Cool on a wire rack completely before serving.

Enjoy and happy holidays!

In health & happiness, 

Dr. Karen


Food Friday: Peanut butter cups

HALF EATEN CUP...I JUST COULDN'T WAIT :) 

HALF EATEN CUP...I JUST COULDN'T WAIT :) 

Around Easter time, I am tempted just like many of us, with mini-eggs and chocolate bunnies! I was able to stay clear for the most part this year. However, my sister was here visiting for the holiday so I wanted to have some Easter treat for us to enjoy. These peanut butter cups were the perfect indulgence, made with only a few all natural ingredients and very easy to make. They were introduced to me by a great friend and colleague and I am happy to keep spreading the word. 

Ingredients:

  • 1 1/3 cups vegan chocolate chips, melted (I use camino fair trade chips; mixed with about 1 tbsp coconut oil)
  • 3/4 cup natural peanut butter
  • 1/4 cup pure maple syrup 
  • 2 tbsp nutritional yeast (gives it the savoury flavour you keep coming back for!)

Recipe:

  • Line 12 muffin cups with paper muffin liners.
  • Pour about a teaspoon of melted chocolate into the bottom of each muffin liner and tap the tin on the counter a couple of times to smooth out. Make sure the chocolate is touching all sides of the liner or your filling will leak out the bottom. Pop the muffin tin in the freezer to set while you prepare the filling (approx 10 minutes).
  • In a small bowl, combine the peanut butter, maple syrup and nutritional yeast. Once the chocolate on the bottom is set, remove the tin from the freezer and divide the peanut butter mixture evenly between the 12 cups, smoothing the peanut butter out so it touches all sides of the liner. It doesn't have to be perfect; the rest of the chocolate will fill in the gaps. 
  • Divide the remaining melted chocolate evenly between the 12 cups, tapping on the counter again to smooth out the chocolate. Place in the freezer until it is set. Once set, remove the muffin liners and store in the refrigerator (or freezer).

I hope you enjoy them just as much as I do :)

In health and happiness, 

Dr. Karen