Food Friday

Food Friday: Cauliflower Pizza with BBQ Chicken

His and Her slices. We were too hungry to take time for a beautiful pic :)

His and Her slices. We were too hungry to take time for a beautiful pic :)

Oh boy, I finally found the perfect cauliflower pizza crust recipe and it is delicious! This has been hit or miss for me over the years but I found the one I now want to write down and keep returning to. I have never been a pizza fanatic since I am lactose intolerant and gluten free, so I’m pretty open to different takes on pizza, but my hubby IS a pizza fanatic and he really enjoys this. Ok, ok, he still needs his fix of the real deal but when we are eating healthy during the week he’s all for it. If you have been prescribed a gluten free diet (by me perhaps or someone else), eating a low carb, paleo or keto diet, or just want a lighter option that is healthy for you this is a great option! Heads up however that this recipe takes some time to make. So it isn’t going to be your quick 30 minute dinner option for a weeknight. OR you can prep the crust beforehand on the weekend, freeze it and voila - a 10 minute meal! Another note, make sure to double (or triple) the recipe if you have big eaters in your house or want leftovers. This amount only made 2 pieces each for us. It is filling enough with all the toppings I put on but worth making extra with all the time involved.

Feel free to mix up the toppings to your liking as well, omit cheese or not (I have to of course - so its more a flat bread with veggies and chicken for me). So here it is!

Ingredients: (Serves 2 not so starving people)

  • 3 cups cauliflower florets

  • 1/2 cup cornmeal (or just under if using goat cheese)

  • 2 eggs, beaten

  • 3 tbsp (up to 1/4 cup) soft goat cheese - can omit if needed

  • 2 tsp italian seasoning

  • Sea salt, pinch

  • 1 tbsp olive oil

  • 1 cup cooked, shredded chicken

  • 1/2 cup bbq sauce

  • Red onion, thinly sliced

  • 1-2 mushrooms, sliced

  • Mozza cheese - optional

  • Pizza sauce

Directions:

  1. Steam cauliflower until tender with a fork. Let cool. (I did this earlier in the day) Add to food processor and process until rice-like (or even smoother). Using a nut mylk bag, cheese cloth or tea towel, squeeze out all liquid from the cauliflower, or at least as much as you can. This step is important. Add the cauliflower to a medium bowl with eggs, seasoning, cornmeal, salt, goat cheese, olive oil and mix well.

  2. Spread “dough” on parchment paper lined baking sheet, using a spatula, into a circle or rectangle 1/2 inch thick. Bake at 425F for 25 minutes until golden. Flip over using the parchment paper and bake another 5-10 minutes to brown on other side, without parchment.

  3. Remove and add thin layer of pizza sauce, mozza, red onion, mushrooms and bbq chicken (or toppings of your choice of course). Broil for a few minutes or bake for 5 minutes, until cheese is melted.

    Enjoy!

In health & happiness,

Dr. Karen

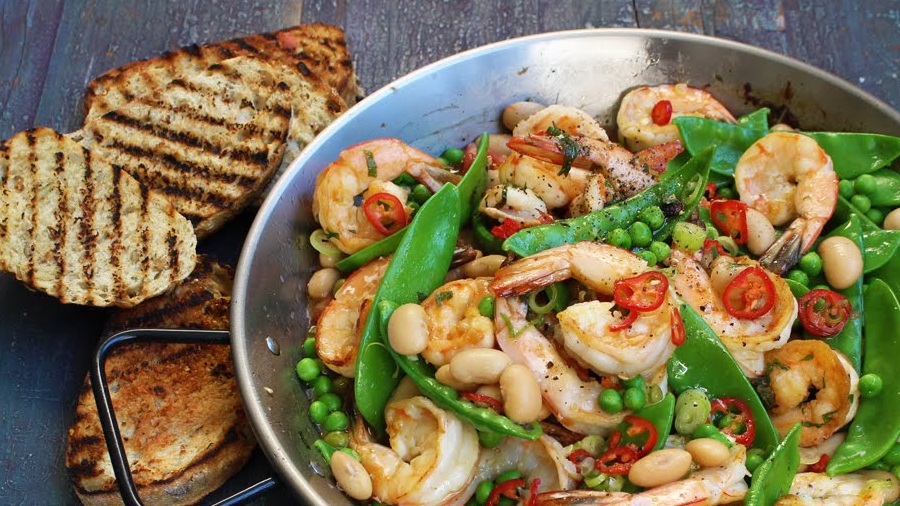
Food Friday: Shrimp "Bruschetta"

www.jamieoliver.com (I ate mine too quickly to take a picture!)

www.jamieoliver.com (I ate mine too quickly to take a picture!)

What a great summer meal that is a little different than the usual burger and salad on the BBQ. I was inspired by Jamie Oliver for this one. I really enjoy his style of cooking because he uses fresh ingredients, the meals are a little rustic and he doesn’t need things to be too pretty, just taste delicious! I very rarely cook shrimp at home but I wanted to try something different. It has also been way too hot to put the stove on for even a short period of time. Lastly, this meal comes together very quickly making it a great weeknight meal for the summer months. What took the longest was peeling the shrimp. This is spicy with the green chilis so if you do not like spicy decrease the quality of peppers or omit completely.

Ingredients:

  • 3-4 green onions, diced

  • 1 red chili/2 green chilis, finely diced

  • 1 bag easy to peel frozen shrimp

  • 2 slices of bread

  • 1 clove garlic - 1/2 minced, 1/2 to rub on toasted bread

  • 1 large can cannelloni beans, drained and rinsed

  • 2 large tomatoes, diced

  • snow peas, 2 large handfuls

  • lemon, zest and juice

  • parsley

  • salt and pepper, to taste

Directions:

  1. Thaw shrimp under cold water in a colander and peel.

  2. Heat 1-2 tbsp olive oil in a wok (but any pan will do) on medium-high heat. Add shrimp and cook until the colour starts to change then add chilis and green onion. Add snow peas and a very small splash of water to help steam. Mix and let steam for a few minutes.

  3. Meanwhile lightly toast bread and rub with garlic for flavour.

  4. Add drained butter beans and steam and stir for 5 minutes. add tomatoes now (or mix in fresh tomatoes at the end which is what I did!), minced garlic, some lemon zest, lemon juice, sea salt and pepper to taste. Finally garnish with some chopped parsley to taste. *Mix in tomatoes now if you prefer them fresh.

  5. Place garlicky toast on a plate and top with shrimp, bean and veggie mixture. Enjoy! Leftovers are great for lunch as well even without the toast.

Let me know what you think in the comments below :)

In health & happiness,

Dr. Karen

Food Friday: Fresh Salad Rolls with Peanut Sauce

These are not mine - We ate ours too fast to get a good pictures :)

These are not mine - We ate ours too fast to get a good pictures :)

If you are looking for a fresh and delicious meal this summer that requires minimal stove time look no further! These do take a little longer to make than the average meal but I find it a little meditative and you can make a big batch all at once to last you a couple meals. So perhaps choose a night you aren’t in a rush, or prep things ahead of time. You can get creative with these salad rolls depending on what vegetables you like. You can swap out chicken as well for marinated and sautéed tofu or shrimp.

What you can prep ahead of time - marinated chicken, peanut sauce, julienned veggies.

Ingredients:

Chicken:

  • 2 boneless, skinless chicken breasts, cut in half horizontally to make 4 cutlets

  • zest and juice of 1 lime

  • 1/4 cup fish sauce or 1 tbsp soy sauce

  • 2 tsp coconut sugar

  • 2 slices red/green jalapeño - optional

  • 1.5 inch piece fresh ginger, sliced

Peanut Sauce:

  • 1-2 garlic cloves, minced

  • 1/2 cup peanut butter or almond butter

  • 2-3 tbsp lime juice

  • 1/4 cup soy sauce/tamari

  • 2 tbsp maple syrup

  • 1 tbsp sesame oil

  • 1 tbsp ginger, diced

  • 1 tbsp apple cider vinegar

  • 4-6 tbsp water (more if needed)

  • hot sauce or Sriracha to taste - for a kick if you want

Wraps:

  • 1/4 cup thinly sliced red cabbage

  • 2 carrots, peeled and julienned

  • 1/2 red pepper, julienned

  • 1/4 cup basil leaves

  • about 1.5 cups vermicelli noodles

  • rice paper wraps

Directions:

  1. Chicken: Add all ingredients including the chicken to a bowl or ziplock bag and marinate for 10 minutes to overnight. Heat 1-2 tbsp olive oil in a pan over medium heat. Add chicken to pan and cook until evenly cooked and browned on each side, about 5 minutes/side. Alternatively BBQ the chicken. Set chicken aside on a wood cutting board and slice thinly.

  2. Peanut sauce: Add all peanut sauce ingredients to a food processor and process until smooth adding water by tbsp as needed. Add more water as needed to get the consistently you want. This peanut sauce will keep in the fridge up to a week.

  3. Noodles: Cook noodles accordingly to package, drain and rinse in cold water and place in a bowl.

  4. Wraps: Set all salad roll ingredients up so to easily grab. Fill a shallow bowl, that is slightly bigger than the rice paper wraps with warm water. Soak a rice paper wrap in the water just until pliable, 30-45 seconds (depending on thickness of rice papers); remove and lay flat on a tea towel lined cutting board (the towel will absorb excess water and help to keep it not sticking). Layer vegetables, chicken, a few basil leaves and noodles across the bottom third of wrap. Fold bottom end up, both sides in then roll up tightly. Be careful not to overstuff the wrap or it will be harder to roll. You quickly learn how much to fill. Repeat for remaining ingredients.

  5. Eat! Dip in or drizzle peanut sauce over the wraps while you enjoy!

These are always a hit at my house and the peanut sauce is always a treat. Any leftover peanut sauce can you used in a stir-fry.

In health & happiness.

Dr. Karen

Food Friday: My Favourite Granola

IMG_0070.jpg

Granola and yogurt never gets old for me! At least not these days. I have made variations of granola over the years but I keep coming back to this recipe adapted from Oh She Glows. It is crunchy from both the large coconut flakes and the liquid used, and a little sweet. You can make it all nut-free if you use sunflower seed butter but I usually switch between creamy cashew butter (if I have some) or almond butter for a little nutty flavour. It smells delicious also!

If you are dairy free there are a few options for dairy free yogurt you can find in Nova Scotia, I like the Silk brand the best. There are more options elsewhere I’m sure! For added protein in the morning I suggest plain greek yogurt, either 2% or for extra creamy 5%! Otherwise Costco has great plain 2% yogurt. Please don’t shy away from the fat in yogurt. It is the sugar we want to avoid in flavoured yogurt. My recommendations when buying yogurt are: 1 - make sure you aren’t sensitive to dairy. 2 - buy plain yogurt and then just add a little bit of sweetness if needed from either your granola, a little pure honey/maple syrup, or 1 tsp of jam. That way you know how much sugar you are eating. 3 - Buy at least 2% instead of steering clear of fat, as this will keep you full for longer. Recent studies have shown that full-fat dairy lowered the risk of being overweight or obese by 8 percent (1), it does not increase your risk of stroke and cardiovascular disease (2), it also reduces the risk of diabetes. That said, dairy has been eliminated from the Canada Food Guide as a food category so please only eat it if you are not sensitive to it, otherwise it causes inflammation in your body, and in limited amounts.

*this post should be sponsored by Costco as you’ll see :)

My Favourite Granola:

Ingredients:

  • 2.5 cups unsweetened coconut flakes (I use Bob’s Red Mill brand from Organic Earth Market)

  • 2 cups rolled oats

  • 3/4 cups raw pumpkin seeds

  • 1/4 cup raw sunflower seeds

  • 1/2 cup hemp hearts (I get mine at Costco)

  • 1 tbsp coconut/cane sugar

  • 1.5 tsp cinnamon (again I get mine at Costco since I use cinnamon a lot)

  • 1/2 tsp sea salt (Costco)

  • 1/3 cup coconut oil (Costco!)

  • 1/3 cup pure maple syrup (Costco!)

  • 2 tbsp almond/cashew butter (almond butter from Costco)

  • 1 tsp pure vanilla extract (Costco…you get the idea now!)

Directions:

  1. Preheat the oven to 300F. Line a large baking sheet with parchment paper.

  2. In a large bowl, combine the coconut flakes, oats, hemp hearts, pumpkin seeds, sunflower seeds, cinnamon, sugar and salt. Change up any of the seeds to your favourite nuts if you like.

  3. In a small pot, melt the coconut oil, and add maple syrup and almond butter. Stir to combine. Remove from the stove and mix in the vanilla extract.

  4. Pour the liquid mixture onto the dry mixture and stir to combine. Spread the granola over the prepared baking sheet evenly.

  5. Bake for 15 minutes then remove and stir. Bake for another 13 minutes, or until the granola is just starting to turn a bit golden. Remove and let sit to cool for about 1 hour. This will allow the granola to harden in crunchy chunks, which I love!

  6. Store the granola in a glass jar (I got mine from the dollar store I believe). Serve with a little plain or greek yogurt, sliced banana or fresh berries. Delicious!

    *Hint - I mix in my Cultured Coconut Kefir and 1 scoop of Sproos collagen to my yogurt before adding the granola to ensure I get my supplements for gut and skin health. :)

Do you have a favourite granola recipe? I’d love to hear!

In health & happiness,

Dr. Karen